
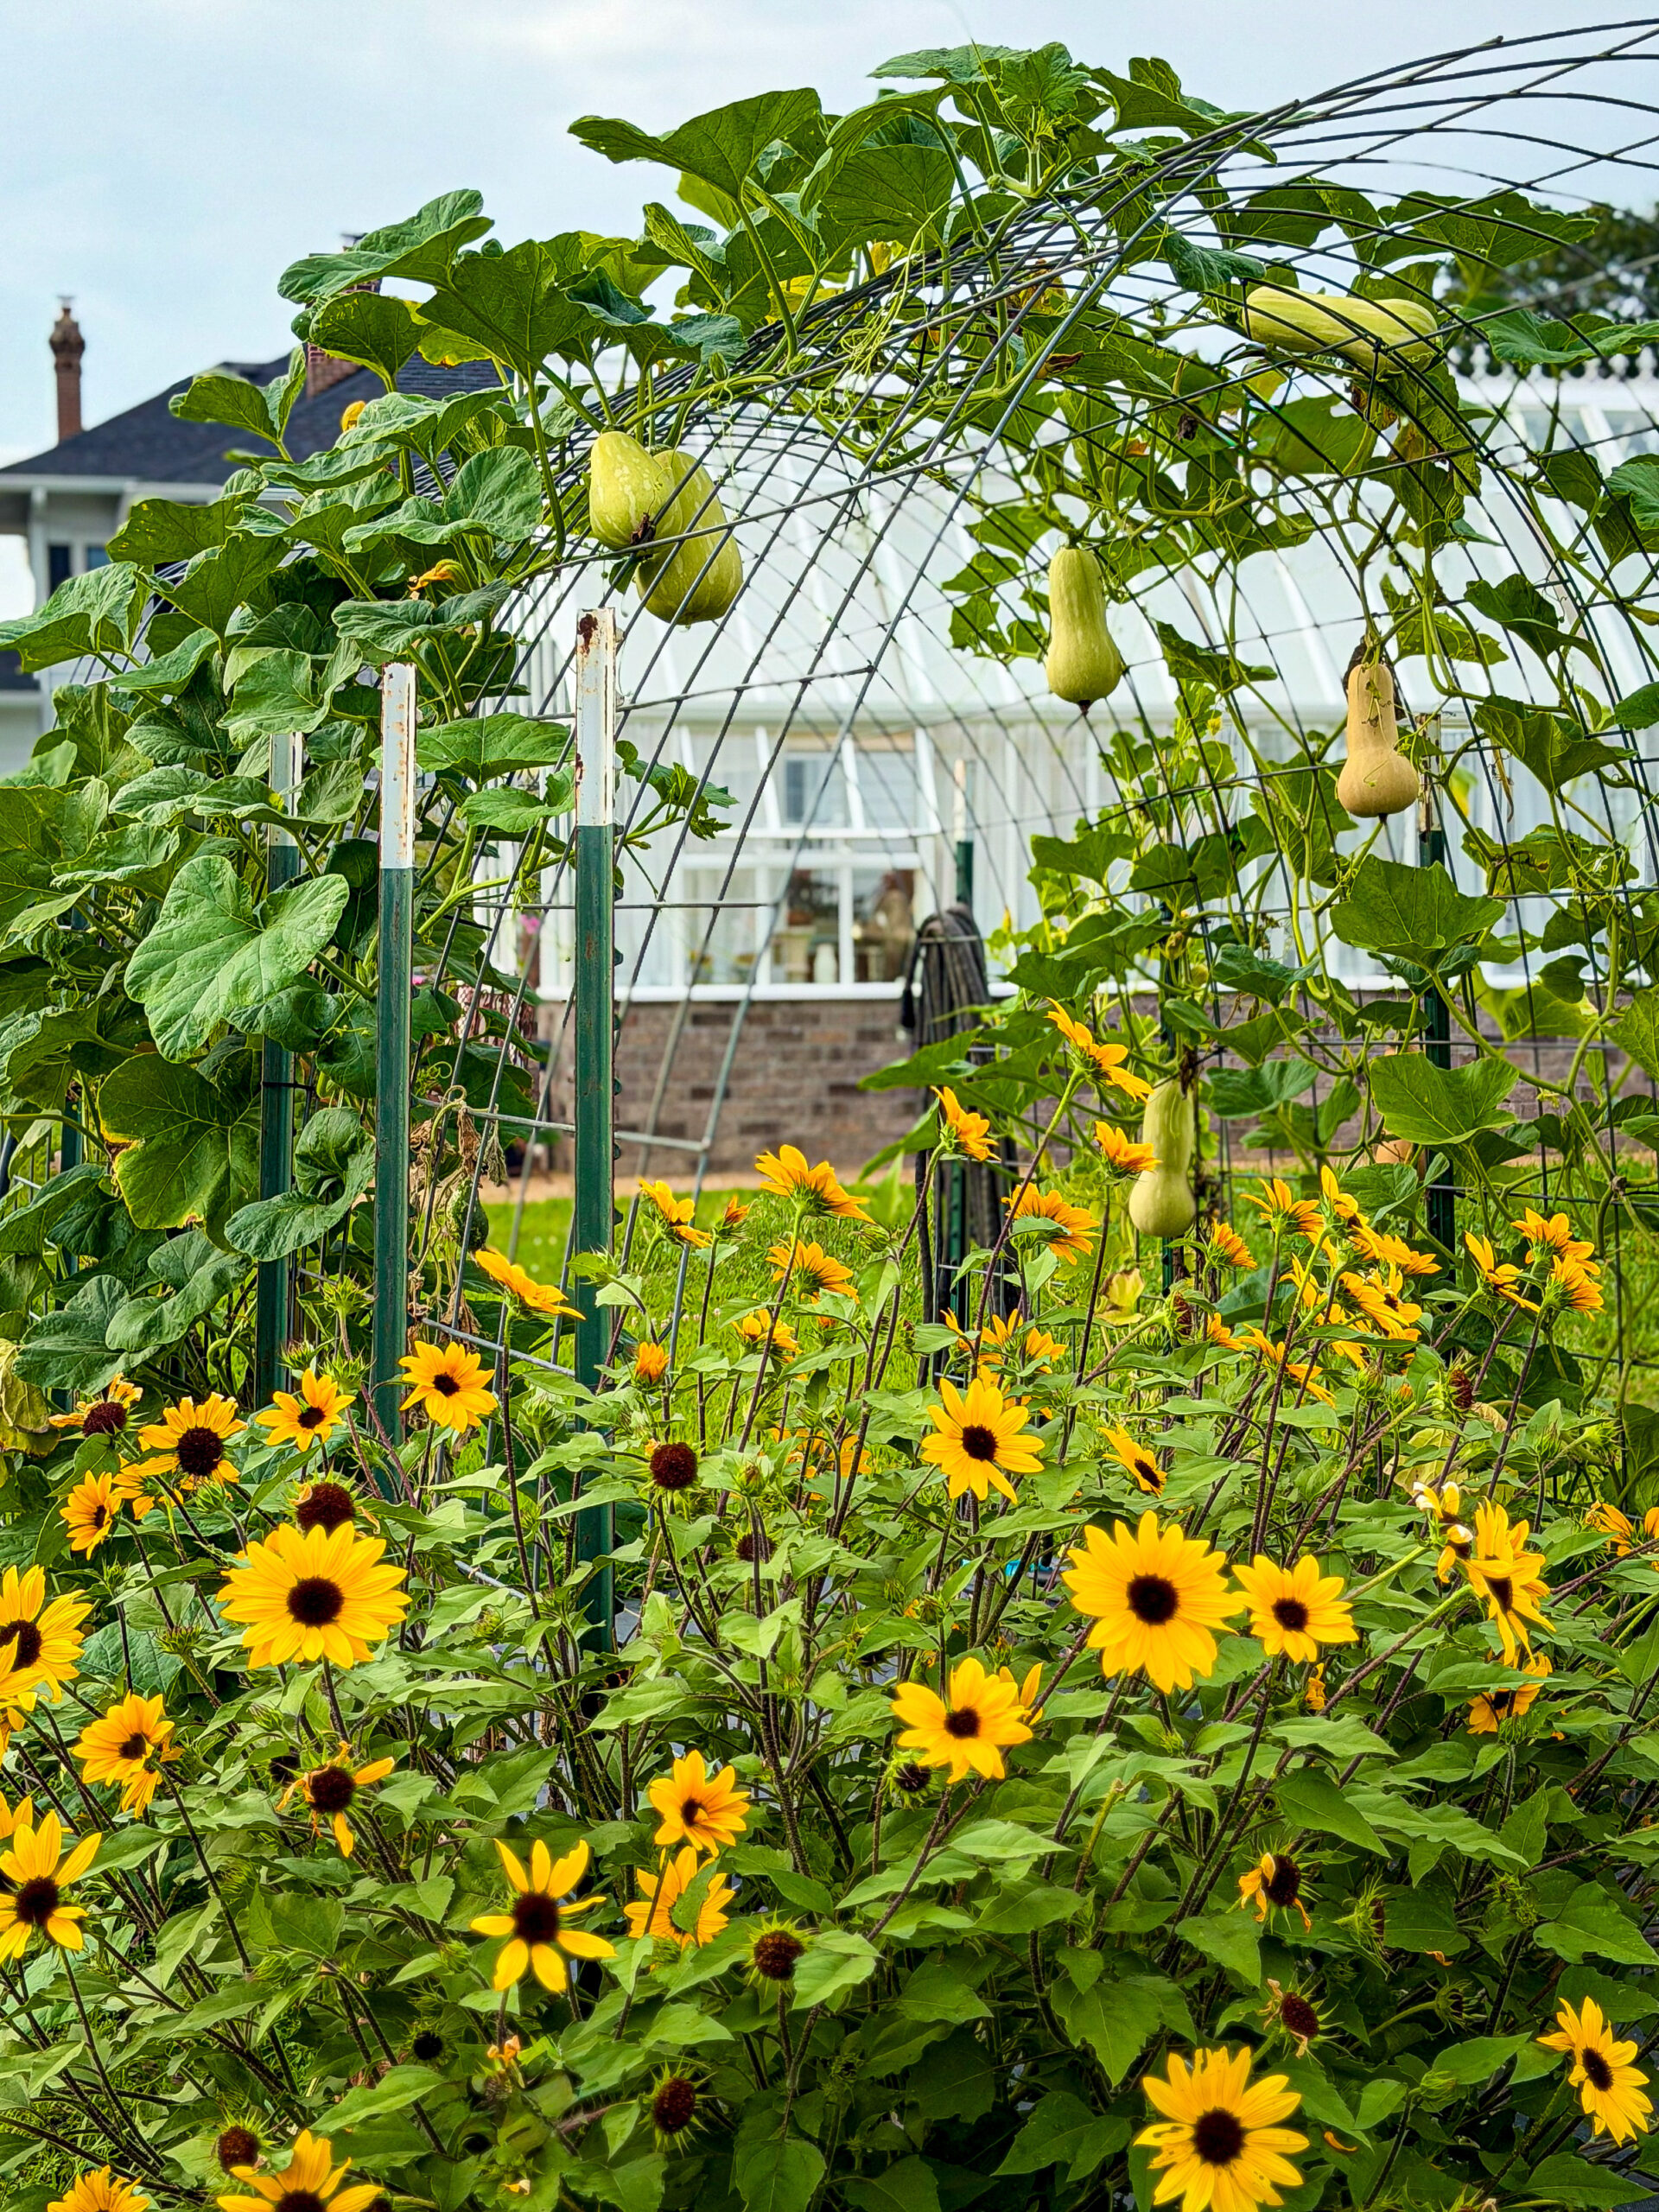
If there’s one crop that asks for a little patience with an absurd amount of payoff, it’s butternut squash. A single well-tended vine can give you soup, roasted sides, and main dishes through most of winter, and honestly, watching those tan, bell-shaped squash swell on the vine in late summer never gets old.
Butternut squash is fairly easy to grow; however, there are a few things you should know in order to have a successful harvest. In this post, I’m covering the following topics that will help set you up for success.
- Part 1: Getting Butternut Squash Started
- Part 2: How Much and When to Water Your Butternut Squash
- Part 3: Fertilizing Butternut Squash: Young versus Mature Plants
- Part 4: Butternut Squash Pest Control
- Part 5: Powdery Mildew Prevention for Butternut Squash
- Part 6: When to Harvest Butternut Squash
- Part 7: How to Cure Butternut Squash for Long Term Storage
- Butternut Squash Recipes
Part 1: Getting Butternut Squash Started
Butternut squash wants warm soil and a long growing season – figure 80 to 100 days from seed to harvest, depending on the variety. Wait until all danger of frost has passed and the soil has warmed up nicely before direct-sowing, or get a jump on things by starting seeds indoors two to three weeks ahead and transplanting outside once it’s warm.

I always recommend planting two seeds together. This gives a chance that at least one will germinate. If they both germinate, gently pull the weaker of the two out or cut the weaker of the two off near the soil level. This is called thinning. If you leave both to grow, neither will do well. They’ll compete with one another for water, sunlight, and nutrients.

If sowing seeds directly in the ground, or planting young plants where they’ll be sprawling out along the ground, space them 18 to 24 inches apart. If growing up a trellis, you can space them 12 to 15 inches apart since the trellis is saving you space by growing vertically.

Whether sowing directly in the ground or in small containers to transplant at a later date, make sure the seeds are making contact with damp soil constantly.
“Damp” is the key word. If they sit too wet, the seeds may rot. If they sit too dry, they just won’t germinate. There must be damp soil to seed contact at all times.
This is one of the reasons I’m a fan of starting them in small containers in the greenhouse, so I can control the moisture level. By growing them inside, I can also keep them shaded and out of the blazing sun. If you don’t have a greenhouse, they can always be started inside under a grow light.

Butternut squash likes full sun and rich, well-draining soil with a little compost worked in. They also like good airflow. They are very susceptible to powdery mildew, and growing them on a trellis is one of the most effective ways to prevent powdery mildew and other fungal diseases.
The leaves are very large, and when sprawling across the ground, they can’t get enough airflow and create a humid canopy against the damp soil, the perfect environment for fungi to grow.

We grow ours over arched cattle panels, with the sides of each panel zip-tied to stake posts. We arched the panels to create a tunnel for us to walk through, and we plant the butternut squash on both sides of the inside of the tunnel. If you create this structure, make sure the stake posts are driven into the ground far enough to make it sturdy.
Now, I’m not going to say we never get powdery mildew, because we most certainly do at times – depending on the year, humidity, rain, and so on, some years are worse than others. But I will say, they do seem to get good airflow growing over the arch.
As they start to grow, we carefully weave the vines in and out of the panels, forcing them to grow upwards. The tendrils grab hold of the panels to support themselves, and we end up with butternut squash on both the inside and the outside of the tunnel.

Part 2: How Much and When to Water Your Butternut Squash
When butternut squash is young, it’s pushing out big leaves but its root system is still very shallow. The roots haven’t ventured very far, and they are still within the top few inches of the soil.
Those big leaves are pumping out water rapidly on hot days, and when the root system hasn’t grown deep enough into the soil to reach the moisture trapped further down, a young plant will suffer very quickly. At this stage, it’s useless to rely on deep, spaced-out waterings, because the roots literally can’t reach it. Water shallow but more frequently, giving the baby roots a drink of water where they live.
As the plant begins to mature, the roots eventually dig down 12 to 14 inches into the soil. Once the squash reaches this stage, your watering completely flips. If you keep giving a mature plant frequent, shallow watering, you’re only watering the top layer of the soil – the water will evaporate before it sinks down to where the root system is growing.
When plants become large and established, you want to switch to a more heavy and infrequent soaking. By soaking deeply a few times a week, you are reaching the mature roots. At this stage, aim for about 1 to 1.5 inches of water per week, delivered in 2 waterings. Deep watering forces the plant’s roots to grow further down into the earth where the soil stays naturally cooler and wetter.
What About During a Drought?
When a severe drought hits, the watering shifts from helping the plant thrive to survival. Since butternut squash has deep roots, it handles drought better than tomatoes or cucumbers. However, a prolonged dry spell still requires attention. In a severe drought, the enemy is not just lack of rain, it’s evaporation. Below is a drought survival guide.
Tips to Keep Butternut Squash Alive in a Drought
1. Water Deep
During a drought, you should increase the water you give them to 1.5 to 2 inches per week, delivered in 2 deep soakings.
2. Keep the water low
Always apply water directly to the soil at the base of the plant. If you have them, use soaker hoses or drip irrigation lines. Keeping the leaves dry helps prevent powdery mildew from taking over.
3. Water early morning
Watering early morning gives the moisture time to sink in deep into the soil before the scorching afternoon sun arrives.
4. Apply a Mulch Blanket
If you do not have mulch around your squash during a drought, you are fighting an uphill battle. Bare soil acts like a sponge in reverse, releasing all its moisture straight into the hot air.
Spread a 2-3 inch layer of clean straw, shredded leaves, or wood chips around the base of your plants and underneath the running vines. This layer keeps the soil temperature down, locks in moisture, and can reduce your watering needs by up to 70%.
5. Don’t Panic and Grab the Hose
If you notice that your butternut squash looks flat, limp, and wilted in extreme heat, they intentionally go limp to reduce their surface area to protect themselves from the sun and conserve water. It’s a natural defense mechanism.
To know if your plants are actually suffering, check them at sunrise. If the leaves are crisp and bright in the cool morning air, they are fine. If they are wilted at 6 a.m., they are genuinely thirsty and need an immediate soak.
6. Pause the Heavy Fertilizers
During a drought, plants become stressed by heat and lack of water. Their growth slows down. By adding fertilizer at this time, it forces the plant to try to create new growth that it doesn’t have the water to support. Even worse, fertilizer salts can build up in dry soil and burn the roots.
7. Expect the Blossom Drop
During a severe drought, you might notice squash plants dropping its flowers before they turn into fruit. Don’t worry; this is just the plant prioritizing its own survival. It knows it doesn’t have what it takes to support too many blossoms, so it sheds some of them.
Once you get the watering routine under control and the temperatures drop a bit, the female flowers will return, and fruit production will start back up again.
Part 3: Fertilizing Butternut Squash: Young versus Mature Plants
Because squash plants are heavy feeders, they will quickly tell you when they are hungry by their leaves turning pale or dropping their baby fruit.
To feed butternut squash safely, tailor fertilizing to their exact life stage.
Phase One: Feeding Young, Vining Plants
When your butternut squash plants are young, their primary job is to build a massive, robust structure. They need to grow deep roots and shoot out long, strong vines covered in large green leaves.
What They Crave at This Stage: Nitrogen
This is the nutrient responsible for leafy green growth.
The Best Fertilizer Combination at This Stage:
Look for a high quality organic fertilizer with a higher first number in the NPK ratio, such as 10-5-5, or a dedicated organic garden blend like Espoma Garden-Tone. Blood meal or a rich layer of well-rotted compost worked gently into the surrounding soil are also excellent choices.
The Routine:
Feed your young plants once they develop their first few sets of true leaves and start actively stretching their vines.
Phase Two: Feeding Mature, Flowering Plants
Everything changes the moment you see those bright yellow blossoms pop open. If you continue feeding your mature plants a lot of nitrogen, you will end up with mostly beautiful green leaves and risk having no actual squash.
What They Crave at This Stage: Phosphorus and Potassium
Phosphorus triggers heavy blooming, while potassium boosts disease resistance, weather stamina, and fruit quality.
The Best Fertilizer Combination at This Stage:
Switch to a low nitrogen, high phosphorus, and high potassium formula. Look for a 5-10-10 or 3-4-6 ratio (often sold as tomato and vegetable or bloom boost formulas). Bone meal is also a fantastic organic source of phosphorus for this stage.
The Routine:
Apply this blend right when the first flowers appear.
Optional: Follow up with a very mild, diluted, liquid fish emulsion or organic compost tea every two to three weeks right at the base of the plant.
Part 4: Butternut Squash Pest Control
I won’t sugarcoat this part! Squash bugs can be the biggest headache while growing butternut squash.
Often, squash bugs are easy to spot during your routine garden care. They love to hang out around the base of the plant or crawl along the vines. However, if you notice localized wilting, sudden yellowing leaves, or scarred, browning stems, don’t just blame the heat. Check for pests.

Squash bugs (the species name is Anasa tristis) inject a toxic substance into the plant while they feed, causing a condition called yellow vine disease. The leaves will droop as if they need water, then turn crisp, brown, and die.
Winning the War Against Squash Bugs
1. Become an Egg Hunter
The absolute best defense against squash bugs is breaking their lifecycle before they ever hatch. Adult squash bugs lay small, football-shaped eggs that are a distinct metallic bronze or copper color.

Look for them tucked tightly into the V-shaped angles where leaf veins meet on the undersides of the leaves. Check your plants every couple of days, and when you find a cluster, scrape them off with a butter knife or a similar tool.
2. Hand-Pick the Adults
Adult squash bugs are dark brown, flat-backed, and highly skilled at playing hide-and-seek near the base of the plant. A great gardener’s trick is to lay a piece of cardboard or a wooden board next to your squash vines overnight. In the morning, flip the board over; you will often find a colony of squash bugs seeking shelter underneath. Pick them up and squash them or drop them into a bucket of warm water mixed with liquid dish soap to drown them.
3. Spray the Nymphs
If the eggs do hatch, you will see clusters of tiny, light gray or greenish nymphs.

Unlike the hard-shelled adults, young nymphs are highly susceptible to organic treatments. Spraying them directly with insecticidal soap or organic horticultural oils like neem oil will easily take care of them. Just remember to apply these sprays in the early morning or evening to avoid burning the leaves in the hot sun.
4. Clean Up in the Fall
Squash bugs survive the winter by burying themselves under dead leaves, old vines, and garden debris. When the season is over, clear out every single bit of old squash foliage from your garden beds. If you had an active infestation, do not compost these vines. Instead, bag them up and throw them away so the bugs don’t have a cozy home for the winter.
Part 5: Powdery Mildew Prevention for Butternut Squash
Powdery mildew is a fungal disease that looks exactly like someone dusted your beautiful green butternut squash leaves with flour.

While it rarely kills the plant outright, it coats the leaves and blocks out the sunlight. Without photosynthesis, your butternut squash can’t generate the energy it needs to mature, leading to smaller, less flavorful fruit.
1. Space Things Out for Maximum Airflow
Powdery mildew thrives in humid, stagnant air. When planting butternut squash, always give the vines plenty of breathing room. Spacing your plants apart keeps the air moving freely through the leaves, which prevents moisture from getting trapped. You can also actively prune away the older, dense leaves near the base of the main stem to open up the center of the plant for more airflow.
Again, growing on a trellis like I mentioned earlier helps provide airflow to your plants.

2. Change How You Water
Fungal spores love wet leaves. Avoid overhead watering or using sprinklers that drench the plant. Instead, direct your hose or drip irrigation system straight to the soil at the base of the vine. If you must water from above, always do it early in the morning so the rising sun has plenty of time to dry the leaves completely before nightfall.
3. Use an Organic Baking Soda Preventative
You can create an inexpensive, natural spray that alters the pH on the surface of the leaf, making it impossible for the fungus to take hold. Mix one teaspoon of baking soda and a few drops of liquid dish soap into one quart of water. Spray this thoroughly on the tops and bottoms of the leaves every 7 to 10 days as a preventative measure before the mildew even shows up. Spray the leaves early morning at dawn, giving the excess moisture plenty of time to evaporate as the sun comes up.
Part 6: When to Harvest Butternut Squash
This is where a lot of gardeners get impatient and pick too soon. A butternut squash is ready when the skin has turned a deep, matte tan with little to no green streaks left and it’s hard enough that you can’t dent it with a fingernail. The vine itself will usually start to die back, and the stem connecting the squash will turn brown and dry.
Cut, don’t pull, leaving about 2 inches of stem attached. That stem is working to protect the squash from rot during storage, so don’t be tempted to trim it close.

Part 7: How to Cure Butternut Squash for Long Term Storage
Curing is what separates a squash that lasts a few weeks from one that can last up to six months. Set your harvested squash in a warm spot, 70 to 85°F with good airflow for 10 to 14 days. This toughens the skin further and helps any small cuts or nicks to heal over, which matters a lot once they’re in storage. A sunny porch or the inside of a greenhouse works beautifully for this if you’ve got the space. We put ours in the mudroom, out of direct sunlight.

Storing for the Long Haul
Once cured, move your squash to a cool, dry spot: 50 to 55°F with moderate humidity is the sweet spot. A basement, root cellar, or unheated closet all work well. Avoid the refrigerator; it’s too cold and humid for long-term squash storage and will actually shorten their life.
I hope these tips help you toward a successful butternut squash harvest in the future. Even with all of this, ours aren’t perfect every year, but that’s gardening, and it’s part of what makes the good years so satisfying!
Butternut Squash Recipes
Have a harvest of butternut squash? Here’s one of my favorite recipes: Roasted Butternut Squash with Rosemary and Garlic.


Leave a Reply